Showing posts with label Clearly Besotted. Show all posts

Tuesday, October 17, 2023

Chibitronics Instagram Hop - Animating LED Stickers

 Hi Everyone,

I am excited to be part of the Chibitronics Instagram Hop for the Animating LED Stickers.

All the information can be found on Instagram @melissagoodman75.

For my card I have used an order stamp by Clearly Besotted, however, I have noticed they did release a similar one.

I have used the Animating 'Rainbow Fade' LED Sticker for this card.


Ingredients

Stamp Set:  Colour my World

Medium:  Copic Markers, Coloured Pencil

Sentiment:  Included in stamp set & Bitty Bold Alphabet Die

Electronics:  Chibitronics 'Craft with Light Kit' & 'Animating Rainbow Fade' LED Sticker

Card Stock:  X-Press It Blending Card

Ink:  TSM Black

Background:  Splotch It Stencil & Distress Ink


Here is a close up of the circuit:


I have sped up the video (just so I can add it here):


Until next time

Melissa

xxxxx


Saturday, August 26, 2023

Poppy Plushies

 Hi Everyone,

For today's card I have used a stamp set from Clearly Besotted a


Ingredients

Stamp Set:  Poppy Plushies

Medium:  Copic Markers

Sentiment:  Just say more die

Card Stock:  X-Press It Blending Card, Tonic Satin Black Velvet Card, Red Card, Vellum

Ink:  TSM Black

Paper:  Black & White Stripe

Die:  Tall Tag

Other:  White Gel Pen


Until next time

Melissa

xxxxx


Monday, July 17, 2023

Blooming Poppies Plushies

 Hi Everyone,

For today's card I have used a stamp set from Clearly Besotted.


Ingredients

Stamp Set:  Bloom Poppies Plushies

Medium:  Copic Markers

(R56, R85, R83. R81, G94, G85, G21)

Sentiment:  Big and Bold

Card Stock:  X-Press It Blending Card

Ink:  TSM Black

Other:  White Gelly Roll Pen


Until next time

Melissa

xxxxx

Friday, May 26, 2023

Chibitronics LED Stickers & Clearly Besotted Stamps

  Hi Everyone,

For today's card I have used Electronics from Chibitronics to light up the flower from Clearly Besotted Stamp set.


Ingredients

Stamp Set:  Flower Friends

Medium:  Copic Markers

Sentiment:  From stash

Electronics:  Chibitronics Craft with Light Kit

Card stock:  X-Press It Blending Card, Kraft Card

Ink:  TSM Black Ink

Background:  Heart Trail Stencil, White Pigment Ink, Distress Oxide Ink (Picked Raspberry)

Other:  Sakura White Gelly Roll Pen, Shimmer Pen, Glossy Accents, White Acrylic Butterfly


Method

1. Create Background & Colour Images

I have created the background using the Heart Trail stencil,White Pigment ink, Distress Oxide Inks and Blending Brushes.

I have also stamped the image onto X-Press It Blending Card and coloured them with Copic Markers.  I fussy cut it leaving a small white border.


2. Circuit

I have stamped the image onto another piece of white card.

This is exactly the same as the card front.  This allows me to easily map the circuit

I have drawn the circuit in pencil, just so I know exactly where the circuit will go.


3. Completing the Circuit

I have used the Chibitronics 'Craft with Light Kit' to complete the circuit.

I love this kit, exactly what you need all in one place/Kit!


4. Adhere card front

Attach the card front to the base.

For this, I have used magnets so the circuit can be shown easily, however you can use foam tape.


5. Let's light this card up!!!

I have used the 2016 battery included in the kit.

Press the battery holder to light up the card (The 'press here' spot).

The positive will connect with the battery allowing the lights to shine.


I hope I have inspired you to give a light up card a go.

If you have any questions, please do not hesitate to ask.


Until next time

Melissa

xxxxx


Tuesday, March 28, 2023

Flower Friends

 Hi Everyone,

For today's card I have used the Sara Renae Clark Color Cube/Palette system to help colour my image from Clearly Besotted.


Ingredients

Stamp Set:  Flower Friends

Medium:  Copic Markers

Color Cube/Palette:  Sarah Renae Clark

Sentiment:  Included in stamp set

Card Stock:  X-Press It Blending Card

Ink:  Paper Rose Premium Black

Other:  Sakura White Gelly Roll 08 Pen


Until next time

Melissa

xxxxx

Saturday, March 11, 2023

Blooming Poppy Plushies

 Hi Everyone,

For today's card I have used a stamp set from Clearly Besotted.


Ingredients

Stamp Set:  Blooming Poppy Plushies

Medium:  Copic Markers

(BV08, BV04, BV13, BV02, G94, YG63, G21)

Sentiment:  Included in stamp set

Card Stock:  X-Press It Blending Card

Ink:  Paper Rose Premium Black

Other:  Circle Die, Sakura White Gelly Roll 08 Pen


Until next time

Melissa

xxxxx

Monday, March 6, 2023

Undercover Plushies

 Hi Everyone,

Another Gift Card and Envelope for today.  I have used a stamp set from Clearly Besotted for this card.  The envelope is a die from 'The Stamp Market'.

I have used my new 'Color Cubes' by Sarah Renae Clark for the colouring of this image.


Ingredients

Stamp Set:  Undercover Plushies

Medium:  Copic Markers

(Mouse:  W6, W5, W4, W3, W2, W1, R20

Flower:  RV99, R39, RV09, RV55, YR27, YR24, G94, YG63, G21)

Sentiment:  from stash

Color Cube:  Sarah Renae Clark (card 050)

Die:  Rip Envelope

Card Stock:  X-Press It Blending Card

Paper:  Cocoa Vanilla

Ink:  Paper Rose Premium Black

Other:  Sakura White Gelly Roll 08 Pen


Until next time

Melissa

xxxxx


Saturday, March 4, 2023

Blooming Poppy Plushies

 Hi Everyone,

I am back with a Gift Card size card.  As yet I have not made the envelope but I will get that made before I pack it up.


Ingredients

Stamp set:  Blooming Poppy Plushies

Medium:  Copic Markers

Sentiment:  Included in stamp set

Card Stock:  X-Press It Blending Card, Poppy Craft 350gsm

Ink:  Paper Rose Premium Black

Other:  Sakura White Gelly Roll 08 Pen


Until next time

Melissa

xxxxx

Tuesday, January 10, 2023

Light up card featuring Clearly Besotted Stamps and Chibitronic LED Stickers

 Hi Everyone,

Here to share my first light up card for 2023.

I just love how easy Chibitronics are to use.


Ingredients

Stamp Set:  Dandelion Flutterby

Medium:  Copic Markers

(Cat:  E44, E43, E42, E41, R20, 0

Butterflies:  BV08, BV04, BV13, BV02, YR04, Y19, Y08, Y06, BG49, BG15, BG13, BG32)

Electronics:  Chibitronics Craft with Light Kit

Card Stock:  Poppy Craft White 350gsm

Ink:  Paper Rose Premium Black

Other: Distress Oxide Ink, Sakura White Gelly Roll 08 Pen, Shimmer Pen, Glossy Accents


A step by step video for the circuit/lights can be found here.


Here is a close up of the circuit:


And a short video of how the lights work:


I hope I have inspired you to give a light up card a go.

If you have any questions, please ask.


Until next time

Melissa

xxxxx

Tuesday, January 3, 2023

Undercover Plushies

 Hi Everyone,

For today's card I have used a stamp set from Clearly Besotted.

While I do like Digital stamps for ease of storage etc, I really love getting the ink out and stamping a stamp.

Ingredients

Stamp Set:  Undercover Plushies

Medium:  Copic Markers

Sentiment:  Included in stamp set & Cut on Silhouette Cameo

Card Stock:  X-Press It Blending Card, Kraft Card

Paper:  MFT Black & White Stripes

Ink:  Paper Rose Premium Black

Other:  Sakura White Gelly Roll 08 Pen, Shimmer Pen, Fairy Drops


Until next time

Melissa

xxxxx

Thursday, December 29, 2022

Sending Sunshine

 Hi Everyone,

For today's card I have used a stamp set from a collaboration with Clearly Besotted and Simon Says Stamp.


Ingredients

Stamp Set:  Sending Sunshine

Medium:  Copic Markers

Sentiments:  Included in stamp set & from stash

Card Stock:  X-Press It Blending Card

Ink:  Paper Rose Premium Black

Other:  Sakura White Gelly Roll 08 Pen, Shimmer Pen, Glossy Accents


Until next time

Melissa

xxxxx


Monday, December 12, 2022

Floating Feathers

 Hi everyone,

For today's card I have used a stamp set from Clearly Besotted.


Ingredients

Stamp Set:  Floating Feathers

Medium:  Copic Markers

Sentiment:  Included in stamp set

Card Stock:  X-Press It Blending Card

Ink:  Paper Rose Premium Black

Other:  Sakura White Gelly Roll 08 Pen, Shimmer Pen, Glossy Accents


Until next time

Melissa

xxxxx

Wednesday, December 7, 2022

Flutterby Friends

 Hi Everyone,

For today's cards I have used a stamp set from Clearly Besotted.

This set was part of the November Release.

Ingredients

Stamp Set:  Flutterby Friends

Medium:  Copic Markers

Sentiments:  from stash

Card Stock:  X-Press It Blending Card

Ink:  Paper Rose Premium Black

Border:  Black Copic Multi Liner Pen

Other:  Sakura White Gelly Roll 08 Pen, Shimmer Pen, Glossy Accents


Until next time

Melissa

xxxxx


Thursday, July 21, 2022

Happily ever after

 Hi Everyone,

For today's card I decided to play with stamping, embossing powder and foiling using the Minc machine.

My first attempt didn't go so well, however my second attempt was better.

The lines are a little thick so I will play with heat settings on the minc.


Ingredients

Stamp set:  Happily ever after

Medium:  Copic Markers

(G94, YG62, G21, R27, R35, RV14, RV13)

Sentiment:  Hot Foil Sentiment

Card Stock:  X-Press It Blending Card

Ink:  Versamark Ink

Other:  Foil, Sequins, Liquid Glue.


Until next time

Melissa

xxxxx

Friday, June 17, 2022

To the Moon & Back with Chibitronics LED Stickers

 Hi Everyone,

For today's card I am sharing a space card using stamps from Clearly Besotted and LED Sticker Lights from Chibitronics.


Ingredients

Stamp Set:  To the Moon & Back

Medium:  Copic Markers

Background:  Distress Ink, White Paint

Card Stock:  X-Press It Blending Card, Smooth White

Ink:  MFT Extreme Black

Other:  White Gelly Roll 08 Pen, Chipboard Stars


Method

1. Background

Firstly, I stamped the images onto X-Press It Blending Card an d coloured them with Copic Markers.  I fussy cut around the images leaving a small white border.  

I also created the background using Distress Ink and white paint splatters.


2. Battery Holder

This card will measure 14 x 10cm once complete.

I have used the Silhouette Cameo to cut the layers for the battery holder.  I glued 8 of these together.

I have glued them together using Liquid Glue from Bearly Arts.  If find this glue does not warp the card and makes it really strong.

I put plain card stock on the back of this card to finish this card.


3. Circuit

The circuit has been designed on the battery holder.

I have marked where the lights will go (from the card front).  I then mapped where I want the circuit to go in pencil.  this makes it easier for me to complete the circuit.


4.  Completing the Circuit

The Circuit has been complete using the Fabric Conductive Tape and LED Stickers.

This card works by pressing on the 'Press Here' spot.  the positve will connect with the battery, turn on the lights.


I added a few more cut layers on top of the circuit to give the lights a barrier to shine.


5. Adhere the card front

It is time to adhere the card front I prepared earlier to the battery compartment.

I have used foam tape and liquid glue to do this.

The coloured images have been adhered using Liquid Glue.


6. Let's light this card up!

This circuit uses a 2032 battery to power this card.

To light this card card up, press on the 'Press Here'.


I hope I have inspired you to give Chibitronics LED Stickers a go.
If you have any questions, please don't hesitate to ask.

Until next time
Melissa
xxxxx



Sunday, June 12, 2022

Happy Birthday & Rainy Day Play

 Hi Everyone,

For today's card I have used a stamp set from Clearly Besotted.  This is one of my favourite sets.

The background is a file I made and cut using the Silhouette Cameo.


Ingredients

Stamp set:  Rainy Day Fun

Medium:  Copic Markers

Sentiment:  File create and cut on the Silhouette Cameo

Card Stock:  X-Press It Blending Card, Black Card

Ink:  MFT Extreme Black

Other:  Shimmer Pen, White Gelly Roll 08 Pen, Glossy Accents, Bearly Arts Glue


Until next time

Melissa

xxxxx

Friday, June 3, 2022

To the Moon & Back

 Hi Everyone,

For today's card I have used a stamp set from Clearly Besotted.

The background has been created using a variety of Distress Inks.


Ingredients

Stamp Set:  To the Moon & Back

Medium:  Copic Markers

Sentiment:  Included in stamp set.

(Stamped with versa mark in and embossed with white embossing powder)

Card Stock:  X-Press It Blending Card

Ink:  MFT Extreme Black

Other:  Chipboard Stars, White Paint


Until next time

Melissa

xxxxx

Wednesday, June 1, 2022

Balloon Bunch Buddies with Chibitronic LED Stickers

 Hi Everyone,

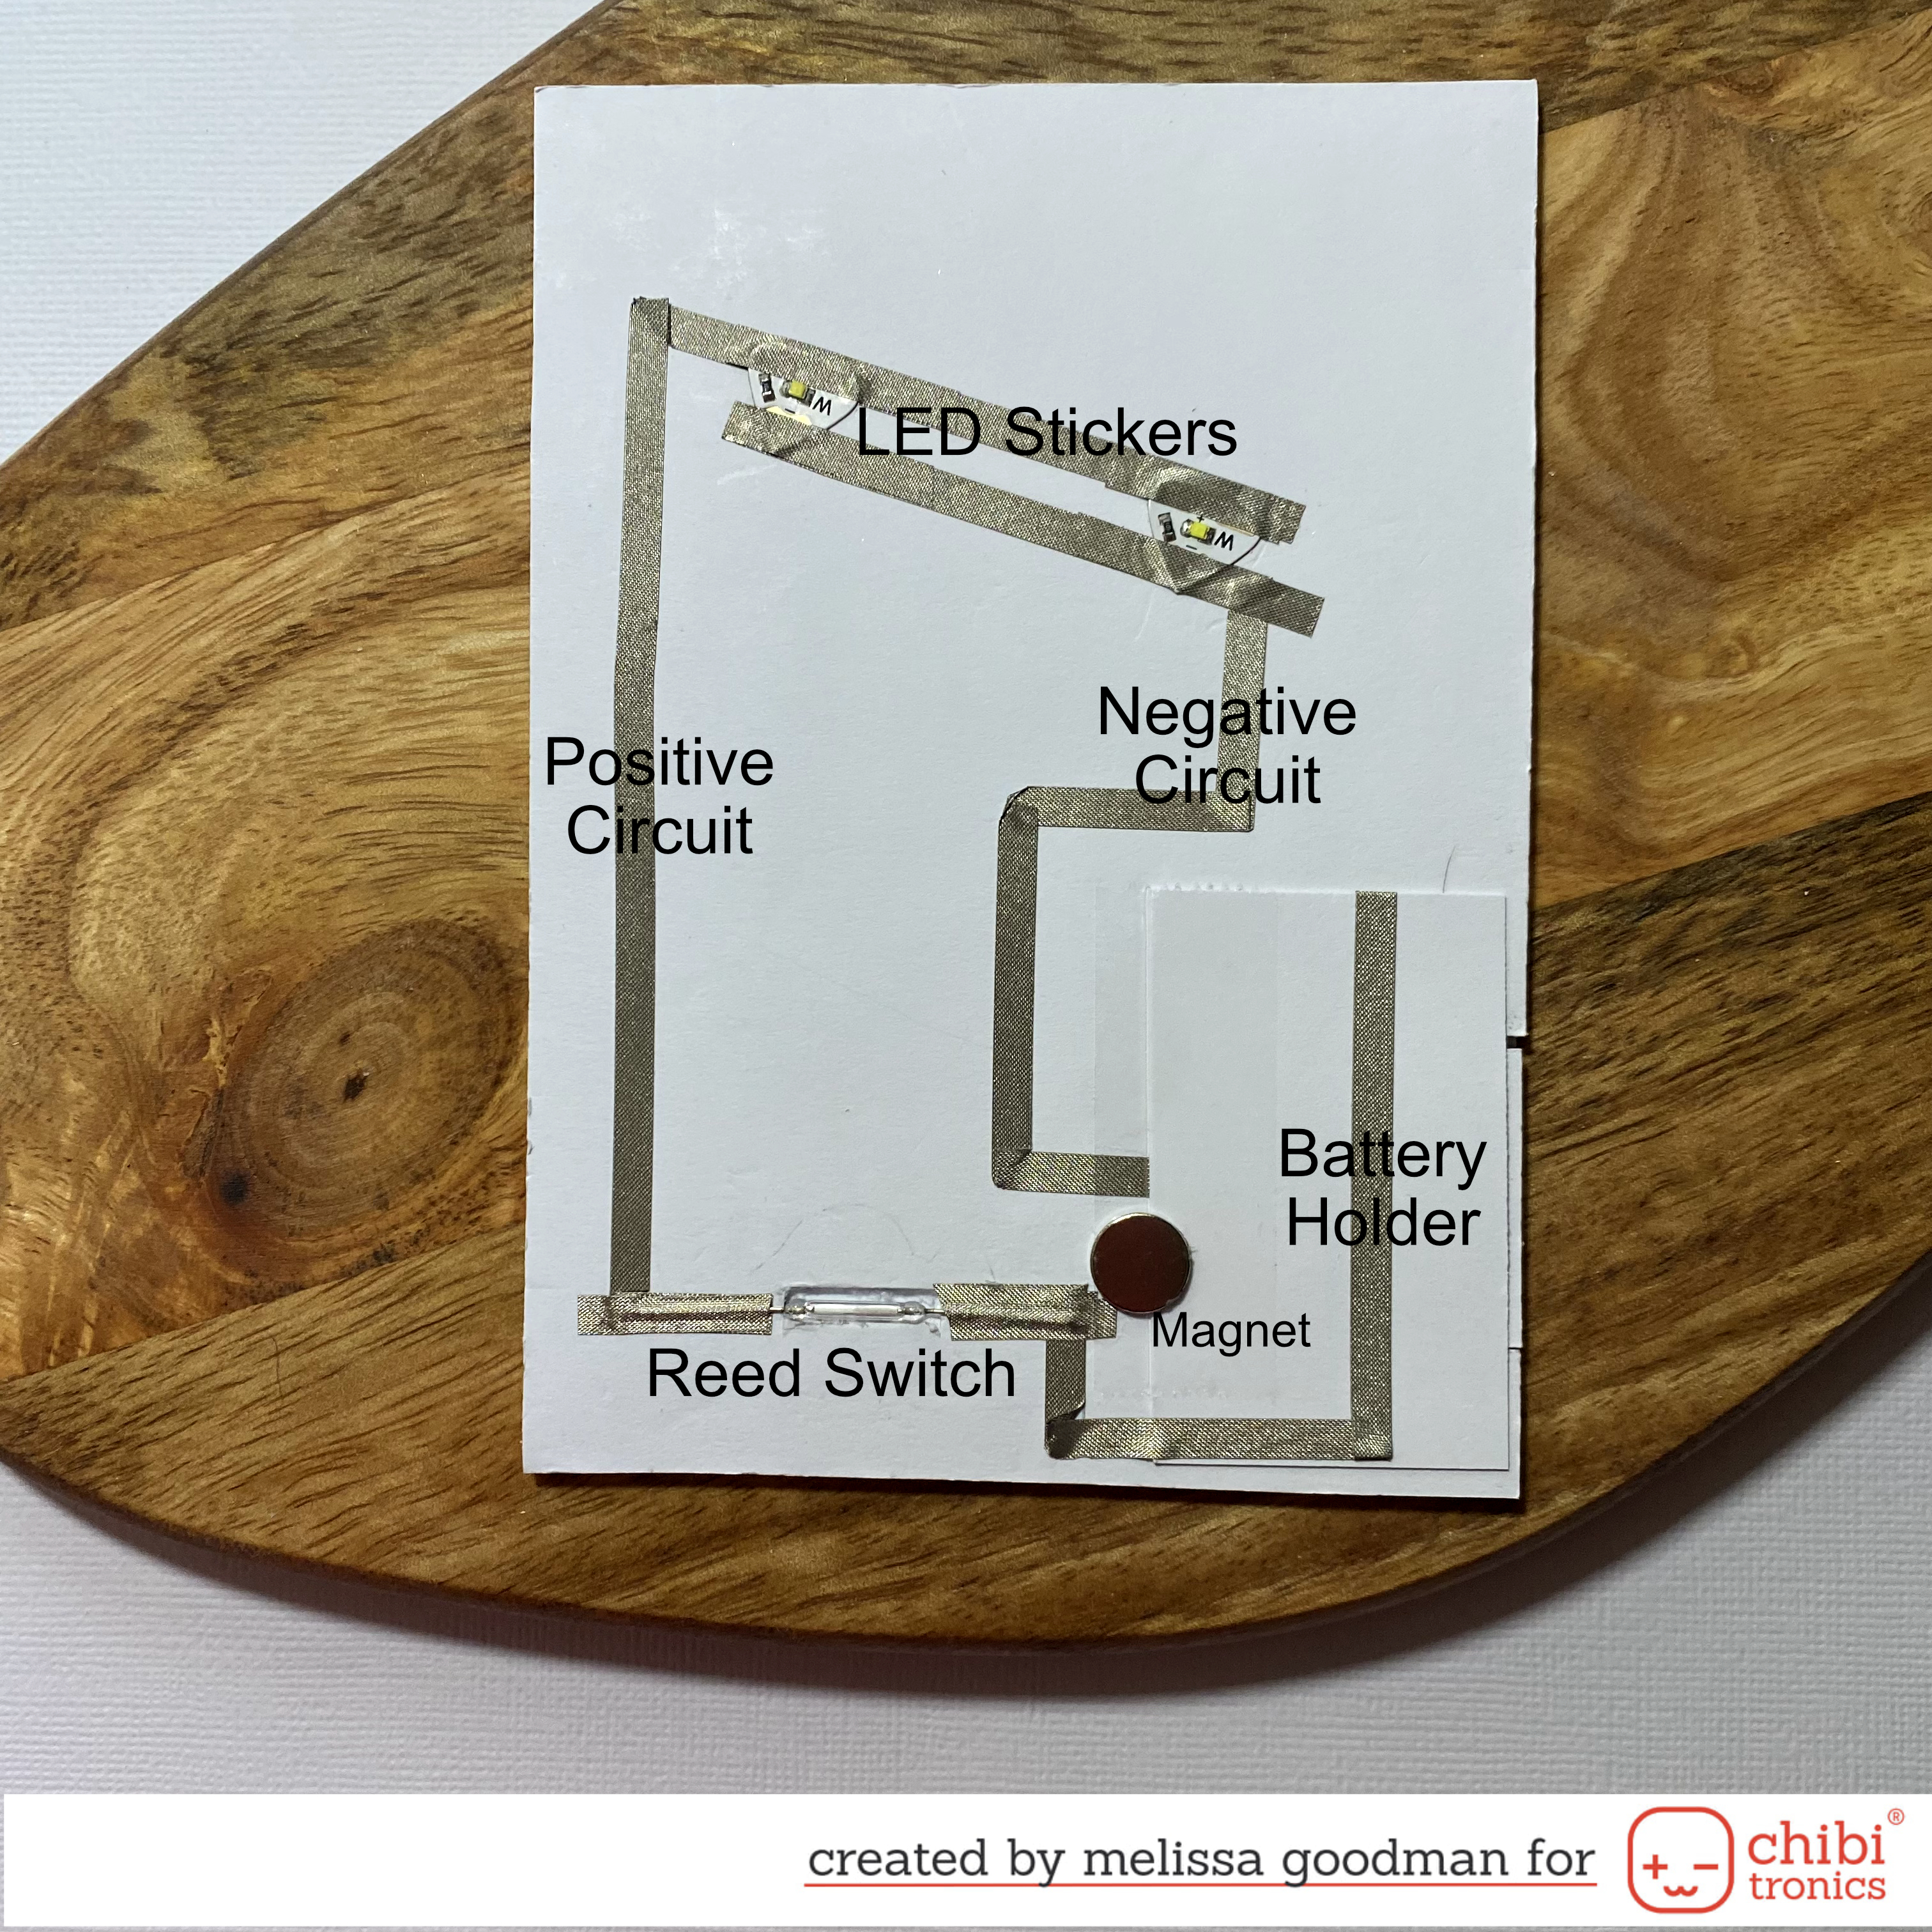
For today's card I have used LED Stickers from Chibitronics to light up the balloons using a Reed Switch and Magnet.


Ingredients

Stamp Set:  Balloon Bunch Buddies

Medium:  Copic Markers

Sentiment:  Hello word and shadow

Electronics:  Chibitronics LED White Stickers, Chibitronics Fabric Conductive Tape, 2032 Battery

Card Stock:  X-Press It Blending Card

Ink:  MFT Extreme Black

Background:  Distress Ink

Other:  Liquid Sparkle, Glossy Accents, Cloud Die, White Gelly Roll 08 Pen, Bearly Arts Liquid Glue


Method

1. Background

Firstly, I stamped the images onto X-Press It Blending Card an d coloured them with Copic Markers.  I fussy cut around the images leaving a small white border.  I then added Glossy Accents to the balloons.

I also created the background using Distress Ink and cloud dies.  Adhered them to the card using liquid glue.

I cut the sentiment from card and adhered it to the background using liquid glue.


2. Battery Holder

This card will measure 14 x 10cm once complete.

I have used the Silhouette Cameo to cut the layers for the battery holder.  I glued 7 of these together.

I have glued them together using Liquid Glue from Bearly Arts.  If find this glue does not warp the card and makes it really strong.

I put plain card stock on the back of this card to finish this card.

3. Circuit

The circuit has been designed on the battery holder.

I have marked where the lights will go (from the card front).  I then mapped where I want the circuit to go in pencil.  this makes it easier for me to complete the circuit.


4.  Completing the Circuit

The Circuit has been complete using the Fabric Conductive Tape and LED Stickers.

This card works by moving a magnet on and off a reed switch.


5. Adhere the card front

It is time to adhere the card front I prepared earlier to the battery compartment.

I have used double sided tape and liquid glue to do this.

The coloured images have been adhered using foam tape.


6. Let's light this card up!

This circuit uses a 2032 battery to power this card.

To light this card move the bottom elephant from below the 'L' to below the 'E'.


I hope you have found this tutorial useful.  If you have any questions, please do not hesitate to ask.


Until next time

Melissa

xxxxx

Monday, April 4, 2022

Balloon Bunch Buddies

 Hi Everyone,

I have been having a great time 'Foiling'.  I have tried 'hot foiling plates' but due to a faulty machine, I have gone back to using my Heidi Swapp Minc Machine and honestly, I am loving it.

For this card I have used the Minc to foil the 'Happy' in the sentiment.

Ingredients

Stamp Set:  Balloon Bunch Buddies

Medium:  Copic Markers

Sentiment:  Die from stash & Silhouette Cameo

Card Stock:  X-Press It Blending Card, Hero Hues Pitch Black

Ink:  MFT Extreme Black

Die:  Mini Slimline Layers

Foiling:  Heidi Swapp Minc, Toner Sheet, Red Foil

Other:  Liquid Sparkle, Glossy Accents


Until next time

Melissa

xxxxx


Wednesday, March 16, 2022

Rainy Day Play

 Hi Everyone,

For today's card I have used an older stamp set from Clearly Besotted.

(It's one of my favourited sets, and yes it is still available!!)

The card has been created using entirely Copic Markers and is a one layer card.

I will be definitely doing this again.  Yes it was challenging but it was fun!!

Ingredients

Stamp Set:  Rainy Day Play

Medium:  Copic Markers

Sentiment:    Included in stamp set

Card Stock:  X-Press It Blending Card

Ink:  MFT Extreme Black

Other:  White Gelly Roll 0.8 Pen


Until next time

Melissa

xxxxxx