Friday, September 30, 2022

Cat Halloween

 Hi Everyone,

I never thought I would be saying this.... but I have loved creating Halloween cards.

So for today I have created another one using a stamp set from CC Designs.

Ingredients

Stamp set:  Cat Halloween

Medium:  Copic Markers

Sentiment:  Included in stamp set

Background:  Distress Ink

Card Stock:  X-Press It Blending Card

Ink:  MFT Extreme Black

Other:  Shimmer Pen, Glossy Accents


Until next time

Melissa

xxxxx

Wednesday, September 28, 2022

Sweet Treats

 Hi Everyone,

So I had a creative block a few months ago.  I went to a craft night and a friend as creating a rolodex and I thought I would love to give that a go.  So I went of the hunt for a rolodex and found one as well as a Memorydex from Heidi Swapp.

I liked the Memorydex better as the pagers were a little bigger and good for my coloured images.

Creative block fixed!!!!!

I love creating these pages.

So......for today's inspiration, I have created a page for my Memorydex card using a stamp set from CC Designs.


Ingredients

Stamp Set:  Sweet Treats

Medium:  Copic Markers

(W7, W5, W3, W1, R20, RV19, RV17, RV55, BV04, BV13, BV02, BG15, BG13, E37, E35, E33, E31)

Sentiment:  Included in stamp set

Paper:  Doodlebug

Card Stock:  X-Press It Blending Card

Other:  White Gelly Roll 08 Pen, Pearls, Glossy Accents


Until next time

Melissa

xxxxx


Tuesday, September 27, 2022

Witch Moon

Hi Everyone,

For today's card I have used an image/stamp from Lili of the Valley (LOTV).

This is available as a Digital stamp and is also available as a polymer stamp.

Ingredients

Image:

Digital:  Witch Moon

Stamp Set: Cute Witches

Medium:  Copic Markers

Background:  Distress ink

(Twisted Citron, Salty Ocean, Blueprint Sketch, Faded Jeans, Black Soot)

Card Stock:  X-Press It Blending Card

Ink:  MFT Extreme Black

Other:  White Gelly Roll 08 Pen, Amsterdam White Ink, Shimmer Pen, Glossy Accents


Until next time

Melissa

xxxxx

Saturday, September 24, 2022

Bats

 Hi Everyone,

I just love this stamp set from CC Designs.

Ingredients

Stamp Set:  Bats

Dies Set:  Bats Outline

Starry Circle

Medium:  Copic Markers

(C9, C7, C5, C3, R20, R35, RV14, RV13)

Sentiment:  Included in stamp set

Background:  Distress Inks (Blueprint Sketch, Faded Jeans, Black Soot)

Card Stock:  X-Press It Blending Card

Ink:  MFT Extreme Black

Other:  White Gelly Roll 08 Pen, Acrylic Hearts


Until next time

Melissa

xxxxx

Friday, September 23, 2022

Christmas Bear

Hi Everyone,

For today's card I have used an image from Amanda Jayne Designs.

Ingredients

Image:  Christmas Bear

Medium:  Copic Markers

Sentiment:  Christmas Sentiments

Card Stock:  X-Press It Blending Card

Background Paper:  Taffy Slimline Paper Pack

Border:  Black Copic Multi Liner Pen

Other:  White Gelly Roll 08 Pen, Glossy Accents, Clear Microbeads, Fairy Drops


 Until next time

Melissa

xxxxx

Thursday, September 22, 2022

Bear

Hi Everyone,

For today's card I have used a new stamp set from Lili of the Valley ( LOTV) .

Ingredients

Stamp Set:  Animal Christmas Wreaths

Medium:  Copic Markers

Sentiment:  Sentiment Sheets

Background:  Distress ink (Salty Ocean)

Card Stock:  X-Press It Blending Card

Ink:  MFT Extreme Black

Other:  White Gelly Roll 08 Pen, Fairy Drops


Until next time

Melissa

xxxxx

Tuesday, September 20, 2022

Bats

 Hi Everyone,

For today's card I have used new stamps and corresponding dies from CC Designs.

Ingredients

Stamps:  Bats - Stamps, Dies

Medium:  Copic Markers

(C7, C6, C5, C4, C3, R20, R35, RV14, RV13)

Sentiment:  Included with stamp set & Mini Alphabet & Numbers Die

Background:  Distress Oxide Inks, Amsterdam Ink & Silhouette tree cut out

(Twisted Citron, Salty Ocean, Blueprint Sketch, Faded Jeans, Black Soot)

Card Stock:  X-Press It Blending Card, Black Card

Ink:  MFT Extreme Black

Other:  White Gelly Roll 08 Pen


Method:

First I created the background for this card by ink blending with Distress Oxide Inks (listed above).  I then cut a tree from vinyl using the Silhouette Cameo Machine.  I adhered this to the card.  I then flicked white ink (Amsterdam Ink) over the background and allowed it to dry.

The images have been stamped onto X-Press It Blending Card using Extreme Black in from MFT.  I have coloured them with Copic Markers and then used the dies to cut out the images.  The image hanging from the tree has had the branch trimmed off.  These images have been adhered to the card base using Foam Tape and Liquid Glue.

To finish off the card, I cut the sentiment 'Bugs' from white card using the 'Alphabet & Numbers die' (link above).  The '& hisses' has been stamped onto black card and embossed with white embossing powder.  These have been adhered to the card using both Foam Tape and Liquid Glue.


Until next time

Melissa

xxxxx

Monday, September 12, 2022

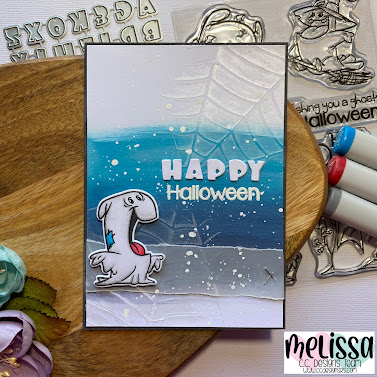
Ghosts

 Hi Everyone,

For today's card I have used a newly released stamp set from CC Designs.

I have also used the coordinating dies for this set.  It is easily done and saves so much time fussy cutting.

Ingredients

Stamp Set:  Ghosts

Medium:  Copic Markers

(Ghost:  C5, C3, C1, C00, BG07, FBG2, BG02, R35, RV14, RV13)

Sentiment:  Included with stamp set and Mini Alphabet & Numbers Die

Background:  Paint, Stencil, Hero Paste (Pearl) & Amsterdam Ink

Card Stock:  X-Press It Blending Card & Vellum

Other:  White Gelly Roll 08 Pen, Staples


Pop on over to the CC Designs Blog.  There you will find the links to a Social Media Hop which is running until the 14th September.  You still have time to join in!!


Until next time

Melissa

xxxxx


Sunday, September 11, 2022

'Chloe Christmas' Collection

Hi Everyone,

For today's card I have used an image from Amanda Jayne Designs.

It is part of the 'Chloe Christmas' Collection.

Ingredients

Image:   Chloe Christmas Collection

Medium:  Copic Markers

Sentiment:  Scripty Merry & Sentiment Sheet

Background:  Distress Ink, White Ink & Bokeh Stencil

Card Stock:  X-Press It Blending Card

Border:  Copic Multi Liner Pen

Other:  White Gelly Roll 08 Pen, Shimmer Pen, Glossy Accents


Until next time

Melissa

xxxxx

Saturday, September 10, 2022

Sweet Cody Candy Corn

Hi Everyone,

 For today's card I have used a new image from Digi Doodle Studios.

Ingredients

Image:  Sweet Cody Candy Corn

Medium:  Copic Markers

Sentiment:  Cut on silhouette cameo

Background:  Paint, White ink & Stencil

Card Stock:  X-Press It Blending Card

Other:  White Gelly Roll 08 Pen


Until next time

Melissa

xxxxx

CC Designs September Release Social Media Hop

 Hi Everyone,

I am very excited to be on my first blog hop with CC Designs.

So let's go ....

Welcome to the C.C. Designs September Release Social Media Hop!  This month we have tricks and treats. We have three darling Halloween sets and two sweet treat critter sets.  Hop alone for your chance to WIN one of two $15 G.C to the store!  We will pull one from Instagram and one from the blog comments.

The Design Team has been giving you previews all week and now we are sharing our Tricks and Treats to inspire you to shop and create with C.C. Designs!

You should have come from Maria Russel's Blog.  Next up is back to the start at the CC Designs Blog.

But before you move on, I would like to share my card with you.....


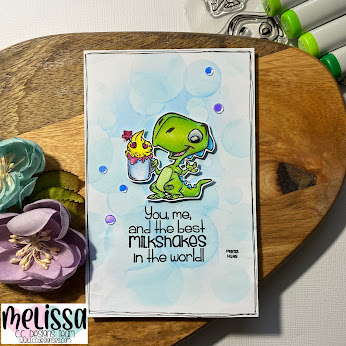
I have used the adorable 'Milkshakes' Stamp set.

This is an interactive card so I will also share the video.


Copic Markers Used:
Dragon:
G05, FYG2, YG07, YG05, YG03,
B05. B04, B02, R20
Eye:
B45, B41
Milkshake:
RV19, RV17, RV55,
Y19, Y08, Y06,
B23, B21

Electronics:


Here is the full line up:
C.C Designs Blog @ccdesignsrs. <--- YOUR NEXT STOP 
Meghan Kennihan @MadebyMeghanK
Cindy Beland @cindy.beland
Kerri Boucher @kerri1974mar
Cristena Bagne @copictopia
Cari Scharping @creaturecomfortcards
Maria Russell @rprmlr77
Melissa Goodman @melissagoodman75. <--- YOU ARE HERE

To enter:
1. Subscribe to the Design Team Blogs, Instagram, & YouTube Channels
2. Leave a Comment
3. Tag your friends for bonus entries
Entries will be accepted until Wednesday September 14th, Winners will be announced on the C.C Designs Blog and FB Page on Friday September 16th.


Thanks for stopping by and Good Luck
Until next time
Melissa
xxxxx


Wednesday, September 7, 2022

Christmas Swirly Sentiments

Hi Everyone,

For today's card I have used a soon to be released stamp from Lili of the Valley (LOTV).

Ingredients

Stamp set:  Christmas Swirly Sentiments

Medium:  Distress Inks

Card Stock:  X-Press It Blending Card

Ink:  Versa Clair Black, Distress Ink

Other:  Sequins 


Until next time

Melissa

xxxxx

Tuesday, September 6, 2022

Never tyre of you

 Hi Everyone,

For today's card I have used a stamp set from Tracey Hey.

This card is interactive, it swings.  Below is a video to show how it works.


Ingredients

Stamp Set:  Never tyre of you

Medium:  Copic Markers

Sentiment:  Included in stamp set

Die:  Spellbinders Holly Jolly, cloud (retired), Stitched rectangle frames

Card Stock:  X-Press It Blending Card, Charcoal Card

Other:  White Gelly Roll 08 Pen, Shimmer Pen, Glossy Accents


Until next time

Melissa

xxxxx

Fairy Friends with Chibitronic LED Stickers

 Hi Everyone,

For today's card I have used a stamp set from CC Designs and LED Stickers from Chibitronics.

For this card I have used the new 'Craft with light kit'.  It makes craft with Chibitronics so much easier as everything you need is in one pack.


Ingredients

Stamp Set:  Fairy Friends

Medium:  Copic Markers

(Skin:  E04, E11, E21, E00, E000, R20

Hair:  E47, E44, E43

Clothes:  BV04, BV13, BV02, BG49, BG15, BG13, BG32

Wings:  BG15, BG13, BG32)

Sentiment:  Included in stamp set

Electronics:  Craft with Light kit from Chibitronics

Card Stock:  X-Press It Blending Card, Smooth white card

Ink:  MFT Extreme Black

Other:  White Gelly Roll 08 Pen, Shimmer Pen, Glossy Accents


Method

1. Background

Firstly, I stamped the images onto X-Press It Blending Card and coloured them with Copic Markers.  I fussy cut around the images leaving a small white border.  

I also created the background using Distress Ink.


2. Battery Holder

This card will measure 14 x 9cm once complete.

I have used the Silhouette Cameo to cut the layers for the battery holder.  I glued 8 of these together.

I have glued them together using Liquid Glue from Bearly Arts.  If find this glue does not warp the card and makes it really strong.

I put plain card stock on the back of this card to finish this card.

The card used is 300gsm smooth white card,

3. Circuit

The circuit has been designed on the battery holder.

I have marked where the light will go (from the card front).  I then mapped where I want the circuit to go in pencil.  This makes it easier for me to complete the circuit.


4.  Completing the Circuit

The Circuit has been complete using the Fabric Conductive Tape and LED Stickers.

This card works by pressing the 'press here'  The positive will connect with the battery, turning on the lights.

5. Adhere the card front

It is time to adhere the card front I prepared earlier to the battery compartment.

I have used double sided tape to do this.

The coloured image have been adhered using foam tape.


6. Let's light this card up!

This circuit uses a 2016 battery to power this card.

To light this card card up, press on the 'Press Here'.


I hope I have inspired you to give Chibitronics LED Stickers a go.
If you have any questions, please don't hesitate to ask.


Until next time
Melissa
xxxxx
Friday, September 2, 2022

Polar Bear

 Hi Everyone,

For today's card I have used an image from Amanda Jayne Designs.


Ingredients

Image:  Polar Bear

Medium:  Copic Markers

Sentiment:  from stash

Card Stock:  X-Press It Blending Card, Kraft Card

Background:  Heart Trail Stencil & Hero Paste

Other:  White Gelly Roll 08 Pen, Black Copic Multi Liner Pen


Until next time

Melissa

xxxxx

Thursday, September 1, 2022

Hedgie Party

 Hi Everyone,

It is a new challenge over on the Digi Doodle Studio Blog.

For my inspiration card I have used the image 'Hedgie Party'.


Ingredients

Image:  Hedgie Party

Medium:  Copic Markers

Sentiment: From stash

Card Stock:  X-Press It Blending Card, American Crafts

Other:  White Gelly Roll 08 Pen. Bubble Bath Baubles, Shimmer Pen, Glossy Accents


Until next time

Melissa

xxxxx