Monday, March 28, 2022

Easter Chick

 Hi Everyone,

For today's card I have used an image from Amanda Jayne Designs.

Ingredients

Image:  Easter Chick

Medium:  Copic Markers

Sentiment:  All Occasions Sentiment Sheet

Card Stock:  X-Press It Blending Card, Gina K

Background:  Foiled Stripes

Die:  Stitched Circle Frames

Other:  White Gelly Roll 0.8 Pen, Fairy Drops, Glossy Accents


Until next time

Melissa

xxxxx

Sunday, March 27, 2022

Bunny on Swing

 Hi Everyone,

For today's card I have used a new image from Lili of the Valley (LOTV).

Ingredients

Image:  Bunny on Swing

Medium:  Copic Markers

Sentiment:  From stash

Border:  Copic Multi Liner Pen

Card Stock:  X-Press It Blending Card

Paper:  Black & White Stripes

Other:  White Gelly Roll 0.8 Pen, Flowers


Until next time

Melissa

xxxxx

Friday, March 25, 2022

Piglet with Snail

 Hi Everyone,

For today's card I have used an image from Lee Holland Art.

Ingredients

Image:  Piglet with Snail

Medium:  Copic Markers

(BV20, E11, R01, E00, E000, R20, B12, B01, B000, B0000)

Sentiment:  Stamping Up & All Occasions Sentiment Sheet

Card Stock:  X-Press It Blending Card, Kraft Card

Other:  White Gelly Roll 0.8 Pen, Liquid Sparkle, Glossy Accents


Until next time

Melissa

xxxxx

Wednesday, March 23, 2022

Cosmos Flower

Hi Everyone,

For today's card I have used an image from Twinkle Lane Designs.

Ingredients

Image:  Cosmos Flower

Medium:  Copic Markers

(BV08, BV04, NV13, BV02, YR27, YR24, YR23)

 Sentiment:  From stash

Paper:  Monochrome Basics 1.0

Card Stock:  X-Press It Blending Card

Other:  Twine, Fairy Drops


Until next time

Melissa

xxxxx


Tuesday, March 22, 2022

Orchid Bloom

 Hi Everyone,

For today's card I have used a Stamp from Paper Rose.

Ingredients

Stamp:  #22781 Orchid Bloom

Medium:  Copic Markers

Sentiment:  #22339 All Occasions Sentiment Sheets

Die:  #17424 Nesting Circles

Card Stock:  Kraft Card, Black Card

Ink:  #19766 Premium Black Ink


Method

  • Card Base:  Black Card 14.5x10.5cm. Set aside.
  • Stamp 'Orchid Bloom' onto 2 pieces of Kraft Card using Black Ink.
  • Trim one of the 'Orchid Bloom' images to 14x10cm and adhere to card base.
  • From the other 'orchid bloom' image, cut with a circle die.  Colour with Copic Markers.
  • Layer coloured 'Orchid Bloom' onto a black circle (the next size up die) and adhere to base card, exactly over the uncoloured image.
  • Trim sentiment and adhere to card base using foam tape.

Until next time
Melissa
xxxxx


Monday, March 21, 2022

Bunny with Magnolia

 Hi Everyone,

For today's card I have used an image from Amanda Jayne Designs.


Ingredients

Image:  Bunny with Magnolia

Medium:  Copic Markers

(C5, C4, C3, C2, C1, R20, R85, R83, R81)

Sentiment:  from stash

Card Stock:  X-Press It Blending Card

Dies:  Mini Slimline Stackables

Background:  Heart Stencil, Distress Oxide Ink

Other:  White Gelly Roll 0.8 Pen


Until next time

Melissa

xxxxx

Sunday, March 20, 2022

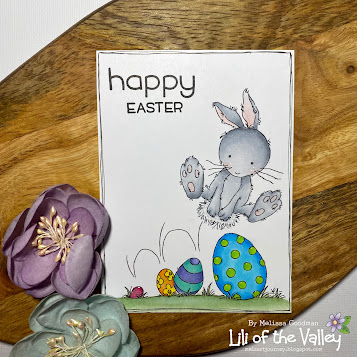
Bunny Hop

Hi Everyone,

For today's card I have used a new image from Lili of the Valley (LOTV).

Ingredients

Image:  Bunny Hop

Medium:  Copic Markers 

Sentiment:  Happy Happy Happy Add on

Card Stock:  X-Press It Blending Card

Border:  Hand drawn using a Copic Multi Liner Pen

Other:  White Gelly Roll 0.8 Pen, Liquid Sparkle, Glossy Accents


Until next time

Melissa

xxxxx

Friday, March 18, 2022

Spring Farm - Piggy

 Hi Everyone,

For today's card I have used a new image from Lili of the Valley (LOTV).

For the card base I have used card from Papertisserie.

Ingredients

Image:  Spring Farm - Piggy

Medium:  Copic Markers

Sentiment:  Big Birthday Wishes

Base Die:  Large Mini Slimline

Card Stock:  X-Press It Blending Card, Smooth White 300gsm

Background:  Distress Oxide (Salty Ocean), Catherine Pooler Ink (Lime Rickety)Cloud Stencil, Grass Die

Other:  White Gelly Roll 0.8 Pen, Glossy Accents, Flower Embellishments


Until next time

Melissa

xxxxx


Thursday, March 17, 2022

Spring Farm - Cow

 Hi Everyone,

For today's card I have used a new image from Lili of the Valley (LOTV).

Ingredients

Image:  Spring Farm - Cow

Medium:  Copic Markers

Sentiment:  All Occasions Sentiment Sheets

Card Stock:  X-Press It Blending Card, Kraft Card

Die:  Track Circle Frames

Other:  Copic Multi Liner Pen, Fairy Drops


Until next time

Melissa

xxxxx

Wednesday, March 16, 2022

Rainy Day Play

 Hi Everyone,

For today's card I have used an older stamp set from Clearly Besotted.

(It's one of my favourited sets, and yes it is still available!!)

The card has been created using entirely Copic Markers and is a one layer card.

I will be definitely doing this again.  Yes it was challenging but it was fun!!

Ingredients

Stamp Set:  Rainy Day Play

Medium:  Copic Markers

Sentiment:    Included in stamp set

Card Stock:  X-Press It Blending Card

Ink:  MFT Extreme Black

Other:  White Gelly Roll 0.8 Pen


Until next time

Melissa

xxxxxx

Tuesday, March 15, 2022

Ladybug Bunny

Hi Everyone,

For today's card I have used an image from Whimsy Stamps.

Ingredients

Image:  Ladybug Bunny

Medium:  Copic Markers

(C7, C5, C3, C1, C00, R20, 0, B21, R29, R27, R35, E27, E25, E23, E21, G94, YG63, G21, B000, B0000)

Sentiment:  All Occasions Sentiment Sheet

Card Stock:  X-Press It Blending Card

Background:  Swiss Dots Embossing Folder

Border:  Copic Multi Liner Pen

Other:  Twine, Liquid Sparkle, Glossy Accents


Until next time

Melissa

xxxxx


Monday, March 14, 2022

Bertie Bear with Flower

Hi Everyone,

I am excited to share that I was asked by Amanda to create some cards with her brand new images.  Thank you for this xx

For today's card I have used the very cute 'Bertie Bear with Flower'. 

I have created a Video showing exactly how I created this entire card, the link can be found in the sidebar.

Ingredients

Image:  Bertie Bear with Flower

Medium:  Copic Markers

(E47, E44, E43, E42, R20, BV04, BV14, BV02, YR27, YR24, YH17, YG13, 0)

Sentiment:  Mother's Days Sentiments

Card Stock:  X-Press It Blending Card

Background:  Rainbow Revival 2

Other:  White Gelly Roll 0.8 Pen, Glossy Accents, Clear Microbeads, Copic Multi Liner Pen


The link to the video (just in case)


Until next time

Melissa

xxxxx


Sunday, March 13, 2022

Lily Bouquet

 Hi Everyone,

For today's card I have used products from Paper Rose.


Ingredients

Stamp:  #24565 Lily Bouquet

Die:  #20868 Nesting Slimline Rectangles

Sentiment: #22339 All Occasions Sentiment Sheets

Medium:  Copic Markers

(RV55, RV63, RV52, V000, G09, YG17, YG13, YR24, YR23, YR20, YG11)

Card Stock:  X-Press It Blending Card, Grey Card

Ink:  #19766 Premium Black

Other:  Tiny Domes, #19763 Liquid Glue


Method:

  • Card Base:  Cut 2nd largest slimline rectangle from grey card.  Then cut down to make it a mini slimline card.  I make them 14cm tall.  The width will be correct.
  • Stamp 'Lily Bouquet' onto X-Press It Blending Card and colour with Copic Markers.  Fussy Cut around the image leaving a small white border.
  • Adhered coloured image to base card using foam tape.
  • Cut sentiment from the sheet and adhere to card using foam tape and liquid glue.
  • Adhere 'Domes' to base card using liquid glue and allow to dry.

Until next time

Melissa

xxxxx

Saturday, March 12, 2022

Lizzie Birthday Elephant

 Hi Everyone,

For today's card I have used an image from Digi Doodle Studios.

Ingredients

Image:  Lizzie Birthday Elephant

Medium:  Copic Markers

Sentiment:  from stash

Card Stock:  X-Press It Blending Card, Kraft Card

Background:  Pops (Green Apple), Confetti Stencil

Other:  Liquid Sparkle, Glossy Accents, White Gelly Roll 0.8 Pen


Until next time

Melissa

xxxxx


Friday, March 11, 2022

Dreamy Rose

 Hi Everyone,

For today's card I have used an image from Alex Syberia Design.

ingredients

Image:  Dreamy Rose

Medium:  Copic Markers

(R39, R27, R35, R43, G94, YG63, G21)

Sentiment: from stash

Border:  Copic Multi Liner Pen

Card Stock:  X-Press It Blending Card


Until next time

Melissa

xxxxx

Thursday, March 10, 2022

Dragon - Clouds

 Hi Everyone,

For today's card I have used a new image from Lili of the Valley (LOTV).

Ingredients

Image:  Dragon - Clouds

Medium:  Copic Markers

Card Stock:  X-Press It Blending Card

Die:  Mini Slimline

Background:  Cloud Die, Distress Oxide Ink (Salty Ocean), Vellum

Other:  Liquid Sparkle, Glossy Accents


Until next time

Melissa

xxxxx

Wednesday, March 9, 2022

Got a Bug?

 Hi Everyone,

For today's card I have used a stamp from The Rabbit Hole Designs.

I have created a video showing the entire creation of this card.  The link can be found on the side panel.

Ingredients

Stamp:  Got a Bug?

Medium:  Copic Markers

(G05, FYG2, YG07, YG05, B04, B02, B01, YR07, YR04, YR15)

Sentiment:  Included in stamp set

(Versamark Pad, White Embossing Powder, Cottontail Embossing Tool)

Card Stock:  X-Press It Blending Card, Black Yupo

Ink:  MFT Extreme Black

Background:  Copic Various Ink (0, FB2, BG05) & White Alcohol Ink

Other:  White Gelly Roll 0.8 Pen, Glossy Accents, Bubble Bath Baubles (Glass Domes)


Just in case you missed it, here is the link to the YouTube Video.


Until next time

Melissa

xxxxx

Tuesday, March 8, 2022

Spring Farm - Cow

 Hi Everyone,

For today's card I have used a new image from Lili of the Valley (LOTV).

Ingredients

Image:  Spring Farm - Cow

Medium:  Copic Markers

Sentiment: from stash

Die:  Nested Circle

Card Stock:  X-Press It Blending Card, Kraft Card

Background:  Cloud Stencil, Grass Die, Distress Oxide (Salty Ocean & Twisted Citron)

Other:  Copic Multi Liner Pen


Until next time

Melissa

xxxxx

Monday, March 7, 2022

Teen Swissie

 Hi Everyone,

For today's card I have used a stamp and die from CC Designs.

Ingredients

Stamp Set:  Teen Swissie

Medium:  Copic Markers

Sentiment:  Included in stamp set

Die:  Glasses

Card Stock:  X-Press It Blending Card, Black Card

Ink:  MFT Extreme Black

Background:  Stencil, Distress Oxide Ink, White Ink, Green Paint

Other:  White Gelly Rolle 0.8 Pen, Glossy Accents


I would like to enter this card into the following Challenge:

CC Designs Monthly Challenge, Twist:  Use a CC Design Die


Until next time

Melissa

xxxxx

Sunday, March 6, 2022

Cosmea

 Hi Everyone,

I have just come home from a great Crafty Weekend.  I got lots of cards made and also one, yes one, scrapbook page done.

So this card is one that I created (I had it planned out) and I have used a stamp set from Create a Smile Stamps.

Ingredients

Stamp Set:  Cosmea

Medium:  Copic Markers

Sentiment:  Bunting Sentiments

Card Stock:  X-Press It Blending Card, Kraft Card

Ink:  MFT Extreme Black

Other:  Copic Multi Liner Pen, Glossy Accents


I would like to enter this card into the following Challenge:

Create a Smile Challenge - Moodboard


Until next time

Melissa

xxxxx

Thursday, March 3, 2022

Blast Off with Chibitronics LED Stickers

 Hi Everyone,

For today's card I have used Chibitronics LED Stickers and Conductive Fabric Tape to light up this card.

This card works by using a 'Slider' technique.  The rocket will slide up, turning on the lights.

Ingredients

Stamp Set:  Blast Off

Medium:  Copic Markers

(Skin: E04, E11, E21, E00, E000, R20, B45, B41

Hair: E47, E44, E43

Suit: B06, B05, B04, B02, N6, N5, N4. N3, N1, N0,

Rocket: R39, R29, R27, R35, 06, B05, B04, B02, YR07, YR04, YR15, Y32, YR31, N9, N8, N7, N6, N5

Saturn:  R35, YR07, YR04, YR15, N1, N0)

Die:  Pierced Oval Dies & Curvy Slider Dies

Background: Nebula Wide Washi Tape

Card Stock:  X-Press It Blending Card

Ink:  MFT Extreme Black, Distress Oxide (Black Soot)

Electronics:  Chibitronics LED Stickers (White), Chibitronics Fabric Conductive Tape, Chibitronics Fabric Patches & 2032 Battery

Other:  White Gelly Roll 0.8 Pen, Silver Eyelets


1. Create card front

Firstly, I have stamped the images onto X-Press It Blending Card and coloured them with Copic Markers.  I fussy cut around the images leaving a small white border and set them aside.  The stars have been stamped onto vellum.

Card Base:  14x10cm

I created the background using wide Washi Tape from Altenew.  The moon is an oval die and coloured with Distress Oxide Black Soot ink. I added some silver eyelets for some texture.

I have punched small circles where I want the lights to be.

I have also cut the 'slider' piece from the card.  Keep the cut out piece. (This is under the rocket).


2. Battery Holder

I use the Silhouette Cameo to cut the layers for the battery holder.  I glue 6 of these together for a 2032 battery.  I glue them together with Liquid glue and allow them to dry completely before completing the card.

I put plain card stock on the back of this to finish the card.


3. Circuit

The circuit has been made on another piece of white card, 14x10cm.

I have traced the circles, slider and battery holder onto this card.

I then mapped where I wanted the conductive tape and lights to go.  This makes it easier for me to complete the circuit.

I have also added the die cut piece of slider and coloured around it with a dark blue Copic marker just in case things don't quite line up.


This is the circuit finished with the Fabric Conductive Tape and LED Stickers.
This card works by the rocket sliding up the card and will turn on the card.

When making this circuit, I have wired the positive straight to the battery and the negative will go through the lights then onto the battery.  At the 'slider' there is a break in the tape.  This will be joined with tape on the back of the rocket (see below).

The circuit uses a 2032 battery to power the circuit.


4. Let's light this card up!!
 

To light up this card, move the rocket up the slider towards the top of the card.


I hope you have found this tutorial useful.  If you have any questions, please do not hesitate to ask.


Until next time
Melissa
xxxxx

Tuesday, March 1, 2022

Bunnie Dew

 Hi Everyone,

Today is the start of a new Challenge on the Digi Doodle Challenge Blog.

Ingredients

Image:  Bunnie Dew

Medium:  Copic Markers

Sentiment:  Cut a part sheets & MIC Chipboard (Retired)

Card Stock:  X-Press It Blending Card, Kraft Card

Ink:  MFT Extreme Black

Other:  White Gelly Roll 0.8 Pen, Liquid Sparkle, Glossy Accents, Twine, Embossing Folder


Until next time

Melissa

xxxxx

Wonky Rainbow & Cloud

Hi Everyone,

For today's card I am featuring a die from Paper Rose.

Ingredients

Die:  #23470 Wonky Rainbow & Cloud

#17562 Clouds

Sentiment:  #22339 All Occasions Sentiment Sheets

Medium:  Distress Oxide Inks (Picked Raspberry, Spieced Marmalade, Squeezed Lemonade, Twisted Citron, Salty Ocean & Wilted Violet)

Card Stock:  X-Press It Blending Card

Other:  #19751 Tiny Domes, #19760 Liquid Sparkle, #19763 Liquid Glue


Method

  • Base card: White card 14x10cm.
  • Cut 'Wonky Rainbow' from base card.  Colour each piece as pictured.  Layer base card onto another piece of white card and trim to size.  Layer coloured pieces back in.
  • From another piece of white card, cut 2 'Wonky Rainbows' can colour the pieces (pink, yellow and blue).  Adhere these to the base card using liquid glue.
  • Cut clouds from white card and adhere to base card using foam tape and liquid glue.
  • Cut sentiment and adhere to base card.
  • Adhere 'Tiny Domes' to base card using liquid glue.


Until next time

Melissa

xxxxx