Friday, April 29, 2022

Little Friends Mouse with Daisy

Hi Everyone,

For today's card I have used an image from Lili of the Valley (LOTV).

Ingredients

Image:  Little Friends Mouse with Daisy

Medium:  Copic Markers

Sentiment:    From Stash

Card Stock:  X-Press It Blending Card

Other:  Shimmer Pen, Glossy Accents, Fairy Drops, White Gelly Roll 0.8 Pen


Until next time

Melissa

xxxxx 

Thursday, April 28, 2022

Crokisses

 Hi Everyone,

For today's card I have used an older stamp set from Create a Smile Stamps.

Ingredients

Stamp Set:  Crokisses

Medium:  Copic Markers

(R35, YR07, YR04, Y19, Y08, Y06, G94, YG63, G21)

Sentiment:  MIC Chipboard (Retired) & All Occasions Sentiment Sheets

Background:  Bubble Circle & Versafine Clair Black Ink

Card Stock:  X-Press It Blending Card

Ink:  MFT Extreme Black

Other:  Shimmer Pen, Glossy Accents, Fairy Drops


I would like to enter this card into the following challenge:

Create a Smile Stamps - Moodboard


Until next time

Melissa

xxxxx


Wednesday, April 27, 2022

Twinkle Littler Star - Light up with Chibitronics

 Hi Everyone,

For today's card I have used a stamp set from Colorado Craft Company and have used LED Stickers and Fabric tape from Chibitronics to light up the star.


Ingredients

Stamp Set:  Twinkle Little Star

Medium:  Copic Markers

Electronics:  LED Stickers - White, Fabric Conductive Tape, 2025 Battery

Card Stock:  X-Press It Blending Card

Dies:  Landscape Trio, Clouds

Other:  White Gelly Roll 0.8 Pen, Liquid Sparkle, Glossy Accents


Method:

Firstly, I have stamped the images onto X-Press It Blending Card and coloured them with Copic Markers.  I added Liquid Sparkle to the stars and set them aside to dry.

I have also created created the background using Distress Oxide Ink (Salty Ocean & Blue Print Sketch) and different dies.

I have marked where I want the lights to go and cut holes for this.


2. Battery Holder


This card will measure 14x10cm once complete.

I have used the Silhouette Cameo to cut the layers for the battery holder.  I glue 8 of these together for a 2025 battery.

I have glued them together using liquid glue from Bearly Arts and allow them to dry completely before completing the card.

I put plain card stock on the back of this to finish the card.


3. Circuit

The circuit has been designed on the battery holder.

I have marked where the lights will go (from the card front).  I then mapped where I want the circuit to go in pencil.  This makes it easier for me to complete the circuit.


4. Completing the Circuit

The Circuit has been completed using the Fabric Conductive Tape and LED Stickers.

This card works by pressing the battery compartment and the light with shine under the stars.


5. Adhere card front

It is time to adhere the card front I prepared earlier to the battery compartment.

I have used double sided tape and liquid glue to do this.

The coloured images have been adhered using foam tape.


6. Let's light this card up!

This circuit uses a 2025 battery to power this card.

Just press on the battery compartment or the 'press here' and watch the stars light up!


I hope you have found this tutorial helpful.

Please do not hesitate to ask any questions.


Until next time

Melissa

xxxxx
Saturday, April 23, 2022

Daisy May and Sweet Pea

 Hi Everyone,

For today's card I have used an image from Digi Doodle Studio.

Ingredients

Image:  Daisy May and Sweet Pea

Medium:  Copic Markers

Sentiment: from stash

Die:  Scallop Circle Frame


Until next time

Melissa

xxxxx

Friday, April 22, 2022

Crazy Chick

 Hi Everyone,

For today's card I have used a stamp set from Create a Smile Stamps.

Ingredients

Stamp Set:  Crazy Chick

Medium:  Copic Markers

Sentiment. Decorated Wishes

Card Stock:  X-Press It Blending Card, Wow Fab Foilers, Grey Card

Background:  WOW Fab Foilers BackgroundsWhite Foil

Ink:  MFT Extreme Black

Other:  White Gelly Roll 0.8 Pen, Glossy Accents, Sparkly Sequins


I was going to enter this card into a challenge, however I am a week too late.  Opps.


Until next time

Melissa

xxxxx


Thursday, April 21, 2022

James Hello

 Hi Everyone,

For today's card I have used an image from Lili of the Valley (LOTV).


Ingredients

Image:  James Hello

Medium:  Copic Markers

Sentiment:  Cut on Cricut Joy, other from stash

Die:  Heart by Little B

Background:  Fluttering Hearts Pierced Coverplate, Distress Ink

Card Stock:  X-Press It Blending Card, Kraft Card, Black Card

Other:  White Gelly Roll 0.8 Pen, Bubble Blow Out Embellishments


Until next time

Melissa

xxxxx

Wednesday, April 20, 2022

Daisy Bouquet

 Hi Everyone,

For today's card I have used many products from Paper Rose.

Ingredients

Stamp:  #18493 Daisy Bouquet

Die:  #21186 Slimline Card Creator 4 Squares

Sentiment:  #19706 Hello Fine Script

Medium:  Copic Markers

(G94, YG63, G21, BG49, NG15, BG13, BG32, G00, YR27, YR24, YR23, BV04, BV13, BV02, BV01, RV19, RV17, RV55, RV63)

Card Stock:  X-Press It Blending Card

Ink:  #19766 Premium Black

Other:  White Gelly Roll 0.8 Pen, Glossy Accents, Clear Microbeads


Method

  • Cut a piece of white card 21.5x10.5cm.  On this piece of card, stamp the 'Daisy Bouquet' to fill the card.  Colour using Copic Markers.
  • Cut the 'Slimline Rectangle' from the coloured 'Daisy Bouquet' piece of card.
  • Adhere all the pieces to another piece of white card.  For this, I used a sheet of double sided tape.  Trim to size.
  • Adhere Clear Microbeads to the centres of flowers using Glossy Accents and allow to dry.
  • Cut shadow for sentiment from vellum and adhere to card base.
  • Cut 'hello' sentiment from black card and adhere to card base.

Until next time
Melissa
xxxxx

Tuesday, April 19, 2022

Little Fairy Mandi

 Hi Everyone,

For today's card I have used an image from Mo Manning.

Ingredients

Image:  Little Fairy Mandi

Medium:  Copic Markers

(E25, E13, E11, E21, R32, E49, E47, Y19, Y08, Y06, BV13, BV02, BV00)

Sentiment:  Say what?

Card Stock:  X-Press It Blending Card, Kraft Card

Paper:  Doodlebug Design

Border:  Copic Multi Liner Pen

Other:  Liquid Sparkle, Glossy Accents


Until next time

Melissa

xxxxx

Monday, April 18, 2022

Dragon on birthday balloon

 Hi Everyone,

Just wanted to share this card I created for my  youngest Son's birthday.

He has always loved the dragon cards I have created and always asks if he can have them, so I decided to create one for him.  He also asked if his card will have numbers on it like his Brother's 18th birthday card.  How could I resist!!

Ingredients

Image:  Dragon on birthday balloon

Medium:  Copic Markers

(B05, B04, B02, B01, BV13, BV02, BV31, Y19, Y08, Y06, Y04)

Sentiment:  from stash & cut on silhouette cameo

Card Stock:  X-Press It Blending Card

Border:  Copic Multi Liner Pen

Other:  Liquid Sparkle, Glossy Accents, White Gelly Roll 0.8 Pen


Until next time

Melissa

xxxxx

Saturday, April 16, 2022

Sloth

 Hi Everyone,

For today's card I have used an image from the CozyArtStore.

This adorable image is designed by the amazing Ukraine Artist Rivus Dea.

The design of this card was inspired by a Tutorial from Jennifer McGuire.


Ingredients

Image:  Sloth

Medium:  Copic Markers

Sentiment:  from stash

Card Stock:  X-Press It Blending Card, Gina K

Border:  Copic Multi Liner Pen

Background:  Fluttering Hearts Pierced Coverplate

Other:  Shimmer Pen, Glossy Accents


Until next time

Melissa

xxxxx

Friday, April 15, 2022

Easter Guinea Pigs

 Hi Everyone,

Happy Good Friday!!

For today's card I have used an image from Rachelle Anne Miller.


Ingredients

Image:  Easter Guinea Pigs

Medium:  Copic Markers

Sentiment:  from stash

Die:  Mini Slimline Stitched Scallop Rectangle

Card Stock:  X-Press It Blending Card

Other:  White Gelly Roll 0.8 Pen, Liquid Sparkle, Glossy Accents


I would like to enter this card into the following challenge:

Rachelle Anne Miller April FB Challenge - Twist: Spring/Easter


Until next time

Melissa

xxxxx

Thursday, April 14, 2022

Dragon Letter

 Hi Everyone,

For today's card I have used an image from Lili of the Valley (LOTV).

Ingredients

Image:  Dragon Letter

Medium:  Copic Markers

Sentiment:  from stash

Card Stock:  X-Press It Blending Card

Background:  Copic Various Ink, Star Die, Black Yupo

Other:  Stars


Until next time

Melissa

xxxxx

Wednesday, April 13, 2022

Bunny

 Hi Everyone,

For today's card I have used a free image from Amanda Jayne Designs.

This image is available free this week from the Kit and Clowder Facebook Group.


I have create a YouTube video showing how I coloured and created this card. 

The link is available in the link tree at the side of this post.

Ingredients

Image:  Bunny

Medium:  Copic Markers

(T5, T4, T3, T2, T1, T0, R20, BV04, BV13, BV02, BG49, BG15, BG13, BG32)

Sentiment:  from stash ('Happy' is foiled)

Card Stock:  X-Press It Blending Card

Background:  Grid Stencil & Distress Oxide Ink (Wilted Violet)

Other:  Glossy Accents


Here is a link to my YouTube Video:

https://youtu.be/V3aEF32qF4k


Until next time

Melissa

xxxxx

Tuesday, April 12, 2022

Easter Tilly

 Hi Everyone,

For today's card I have used an image from Amanda Jayne Designs.

The dies I have used are from Paper Rose, I think they work really well together.

Ingredients

Image:  Easter Tilly

Medium:  Copic Markers

Sentiment:  Message me

Card Stock:  X-Press It Blending Card

Inks:  Distress Oxide (Salty Ocean) & Catherine Pooler (Lime Rickety)

Dies:  Eggscape,  Eggs& Bunnies

Border:  Copic Multi Liner Pen

Other:  Flowers, Liquid Sparkle, Glossy Accents


Until next time

Melissa

xxxxx

Sunday, April 10, 2022

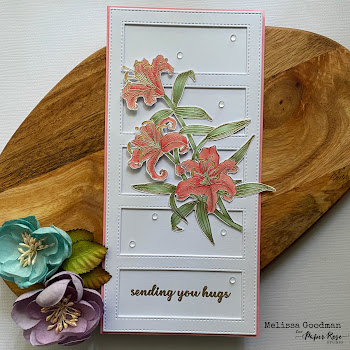
Lily Bouquet

 Hi Everyone,

For today's card I have used many products from Paper Rose.

I have also decided to emboss the 'Lily Bouquet' to give a soft effect.

Ingredients

Stamp:  #24565 Lily Bouquet

Die:  #20871 Slimline Card Creator 1 Rectangles

Medium:  Copic Markers

(G94, YG63, G21, R35, R43, R32, RV42)

Sentiment:  SSS 2021 Collab set with Paper Rose

Card Stock:  X-Press It Blending Card

Ink:  #19766 Premium Black, Versamark Ink

Other:  Glass Domes, Platinum Embossing Powder, #19763 Liquid Glue


Method

  • Card Base:  21.5x10.5cm White Card.  Colour around the edge using a contrasting Copic Marker. (I used R43)
  • On a piece of X-Press It Blending Card, Stamp 'Lily Bouquet' using Versamark ink, embossing using WOW Platinum Embossing Powder and heat to set.  Colour using Copic Markers.  Fussy Cut leaving a small white border and set aside.
  • Cut Slimline Rectangle from white card twice, layer using liquid glue and adhere to base card.
  • Stamp sentiment into bottom rectangle using Versamark ink and embossing powder.
  • Adhere coloured 'Lily Bouquet' image to card base using foam tape and liquid glue.
  • Adhere Glass Domes to card using liquid Glue.

Until next time
Melissa
xxxxx

Saturday, April 9, 2022

Rainy Day Gnome

 Hi Everyone,

For today's card I have used a brand new image from Digi Doodles Studio.

It is just the sweetest.  I love Gnomes!!!

Ingredients

Image:  Rainy Day Gnomie

Medium:  Copic Markers

(E000, E04, E11, E21, E00, BG49, BG15, BG13, BG32, BV04, BV13, BV02, W5, W3, W1, W00)

Sentiment:  Included with Image

Background:  Cloud Stencil, Grass Die, Distress Oxide Ink (Salty Ocean & Twisted Citron)

Die:  Mini Slimline Layers

Other:  Raindrops, Liquid Sparkle, Glossy Accents


Until next time

Melissa

xxxxx


Chocs away

 Hi Everyone,

Just want to share this card using a newer image from Lili of the Valley (LOTV).

Ingredients

Image:  Chocs away

Medium:  Copic Markers

Sentiment:  from stash

Card Stock:  X-Press It Blending Card

Other:  Liquid Sparkle, Glossy Accents


Until next time

Melissa

xxxxx

Friday, April 8, 2022

Panda

 Hi Everyone,

For today's card I have used an image from Stuff-Deluxe and have used LED Stickers and Fabric tape from Chibitronices to light up the star.

Ingredients

Image:  Panda

Medium:  Copic Markers

Sentiment:  Printed from the Computer

Electronics:  LED Stickers - White, Fabric Conductive Tape, 2016 Battery

Card Stock:  X-Press It Blending Card

Border:  Copic Multi Liner Pen

Other:  White Gelly Roll 0.8 Pen, Liquid Sparkle, Glossy Accents


Method:

Firstly, I have printed the image and sentiment onto X-Press It Blending Card and coloured the image with Copic Markers.

I cut the card down to 14x10cm as this will be the finished size of my card.


2. Battery Holder


I used the Silhouette Cameo to cut the layer for the battery holder.  I glue 6 of these together for a 2016 battery.  I glue them together with Liquid glue and allow them to dry completely before completing the card.
I put plain card stock on the back of this to finish the card.

3. Circuit

The circuit has been made on another piece of white card which measures 14x10cm.
I have made a mark where I want the light to go.
I then mapped where I want the circuit to go, this makes it easier for me to complete the circuit.

4. Completing the Circuit
The Circuit has been completed using the Fabric Conductive Tape and LED Stickers.
This card works by pressing the battery compartment and the light will shine under the star.


5. Let's light this card Up!
This circuit uses a 2016 battery to power this card.


I hope you have found this tutorial helpful, please do not hesitate to ask any questions.


Until next time
Melissa
xxxxx


Thursday, April 7, 2022

Bunny & Guinea

 Hi Everyone,

I just couldn't resist this new image from Rachelle Anne Miller Stamps and of course I had to light up the balloon using Chibitronic LED Stickers.


Ingredients

Image:  Bunny & Guinea

Medium:  Copic Markers

Sentiment:  Included with image

Electronics:  Chibitronics LED Stickers (White), Chibitronics Fabric Conductive Tape, 2032 Battery

Card Stock:  X-Press It Blending Card

Border:  Copic Multi Liner Pen

Other:  Liquid Sparkle, White Gelly Roll 0.8 Pen, Glossy Accents


I would like to enter this card into the following challenge:

Rachelle Anne Miller Facebook Challenge - Easter/Spring Twist


Until next time

Melissa

xxxxx

Wednesday, April 6, 2022

Blossom Flower - Foiled

 Hi Everyone,

I am back with another image from Lee Holland.

When I saw this image, I just knew I had to 'Foil' it.

Firstly I printed the image using a toner laser printer, coloured it with Copic Markers then 'Foiled' it using the Heidi Swapp Minc.

I just love how it turned out.

Ingredients

Image:  Blossom Flower

Medium:  Copic Markers

(E29, E27, E25, E23, G94, YG63, G21, YR27, YR34, YR23, E43, R56, R85, R83, R81)

Sentiment:  Thank you fine script (also foiled) & stamp from stash

Card Stock:  X-Press It Blending Card

Foiling:  Heidi Swapp Minc, Silver & Gunmetal Foil


Until next time

Melissa

xxxxx

Tuesday, April 5, 2022

Dragon looking at a star

 Hi Everyone,

For today's card I have used an image from Lee Holland.

I just love this Dragon series and couldn't help but light the star up with LED Lights.

Ingredients

Image:  Dragon looking at a star

Medium:  Copic Markers

(B05, B04, B02, B01, B00, B000, BV13, BV02, BV01, BV31, Y19, Y08, Y06, G94, YG63, G21)

Sentiment:  To the moon & back

Electronics:  Chibitronics LED Stickers, Chibitronics Fabric Conductive Tape, 2025 Battery

Card Stock:  X-Press It Blending Card

Ink:  MFT Extreme Black

Other:  Liquid Sparkle, Glossy Accents


Until next time

Melissa

xxxxx

Monday, April 4, 2022

Balloon Bunch Buddies

 Hi Everyone,

I have been having a great time 'Foiling'.  I have tried 'hot foiling plates' but due to a faulty machine, I have gone back to using my Heidi Swapp Minc Machine and honestly, I am loving it.

For this card I have used the Minc to foil the 'Happy' in the sentiment.

Ingredients

Stamp Set:  Balloon Bunch Buddies

Medium:  Copic Markers

Sentiment:  Die from stash & Silhouette Cameo

Card Stock:  X-Press It Blending Card, Hero Hues Pitch Black

Ink:  MFT Extreme Black

Die:  Mini Slimline Layers

Foiling:  Heidi Swapp Minc, Toner Sheet, Red Foil

Other:  Liquid Sparkle, Glossy Accents


Until next time

Melissa

xxxxx


Sunday, April 3, 2022

Easter eggs

 Hi Everyone,

For today's card I have used a stamp set from Create a Smile Stamps.

Ingredients

Stamp Set:  Easter Eggs

Sentiment:  Happy

Background:  Stencil 'Bubble Circle' & Distress Oxide Ink

Card Stock:  Gina K

Ink:  Versamark

Other:  White Embossing Powder


I would like to enter this card into the following challenge:

Create a Smile - Moodboard


Until next time

Melissa

xxxx


Friday, April 1, 2022

Flourish Egg

 Hi Everyone,

For today's card I have used a few dies from Paper Rose.

Ingredients

Dies:  #21300 Flourish Egg 2

#20868 Slimline Nested Rectangles

#16871 Banner 2

Sentiment Dies:  #19619 Outline Alphabet

#21291 Easter/Bunny/Kisses

Card Stock:  Smooth White, Gina K

Other:  #19763 Liquid Glue


Until next time

Melissa

xxxxx